dns made easy!
#Table of Contents
- introduction
- What is DNS?
- How DNS Resolution Works
- 1. You enter a domain
- 2. Your computer contacts a recursive resolver
- 3. The resolver asks a Root Nameserver
- 4. The resolver asks the TLD Nameserver
- 5. The resolver asks the Authoritative Nameserver
- 6. The IP address is returned
- 7. Your browser connects to the server
- Structure of DNS
- 1. Root
- 2. Top-Level Domains
- 3. Second-Level Domain
- 4. Subdomains
- 5. Hostnames
- Common DNS Records
- A Record
- CNAME Record
- MX Record
- TXT Record
- NS Record
- Adding Custom Domains
- Step 1: Buy a Domain
- Step 2: Add the Domain to Cloudflare
- Step 3: Change Your Nameservers
- Step 4: Add the Domain to Vercel
- Step 5: Configure the DNS Records
- Step 6: Verify the Domain
- Understanding What We Just Configured
- Common DNS Problems
- 1. DNS Propagation
- 2. Incorrect Nameservers
- 3. Incorrect A or CNAME Records
- 4. Conflicting DNS Records
- 5. Cloudflare Proxy Issues
- 6. SSL Certificate Issues
- 7. www vs Root Domain
- Final Thoughts
- Bonus
introduction
You probably use DNS every single day without realizing it.
Whenever you type something like google.com, github.com, or your own website's domain into a browser, your computer needs to figure out one simple thing:
Where is this website actually located?
Computers communicate using IP addresses, but remembering something like 142.250.195.14 isn't exactly convenient. Instead, we use human-readable domain names such as google.com.
This is where DNS, or the Domain Name System, comes in.
DNS acts like the internet's address book. It takes a domain name and helps your browser find the server that should handle the request.
In this article, we'll first understand how DNS works behind the scenes, and then put that knowledge into practice by setting up a custom domain using Cloudflare and Vercel.
By the end, you should understand not only how to connect a domain to a website, but also what is actually happening when you do it.
What is DNS?
The Domain Name System (DNS) is the system responsible for translating human-readable domain names into IP addresses.
When you visit:
github.com
your browser cannot directly connect to github.com. It needs an IP address to know where to send the request.
DNS performs that translation for you.
You can think of it like the internet's phonebook:
Domain name                 IP address

github.com          →       <IP address>
example.com         →       <IP address>
google.com          →       <IP address>
Without DNS, we would have to remember IP addresses every time we wanted to visit a website.
And that would be terrible.
How DNS Resolution Works
The process of finding the IP address associated with a domain is called DNS resolution.
Let's say you enter:
example.com
into your browser.
Your computer needs to find the IP address associated with example.com before it can establish a connection to the website.
This process happens mostly behind the scenes.
The request typically passes through several parts of the DNS hierarchy:
Browser
   ↓
Recursive DNS Resolver
   ↓
Root Nameserver
   ↓
TLD Nameserver (.com)
   ↓
Authoritative Nameserver
   ↓
IP Address
   ↓
Web Server
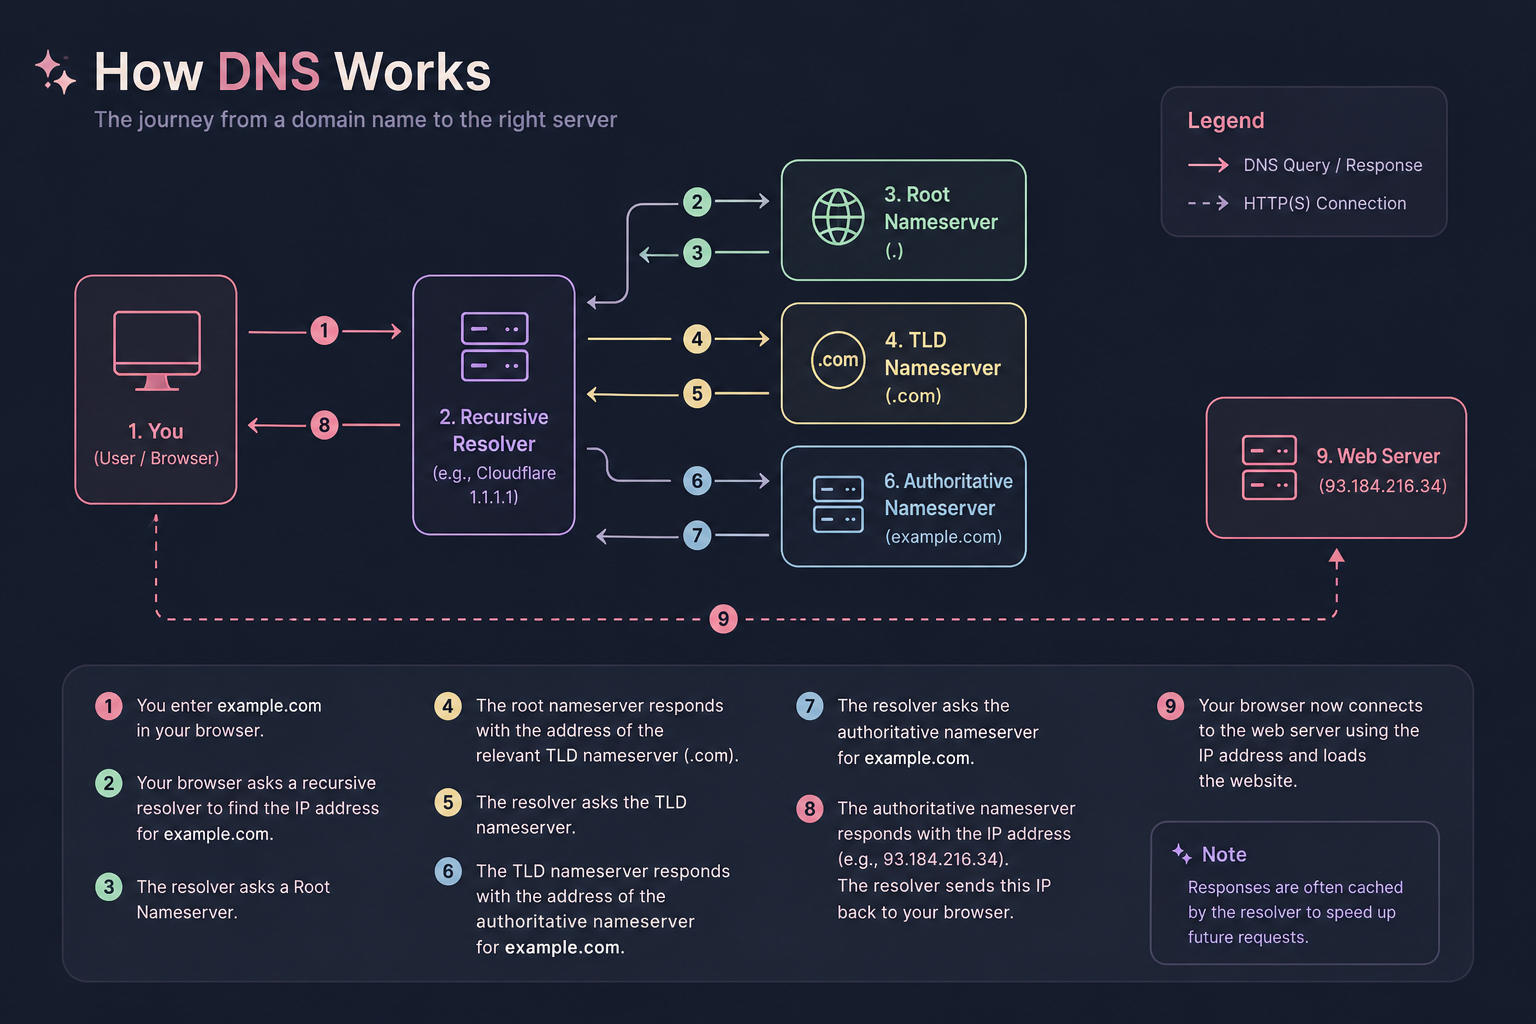
1. You enter a domain
You type:
example.com
into your browser.
Before making the actual connection to the website, your computer needs to resolve the domain name.
2. Your computer contacts a recursive resolver
Your device sends a DNS query to a recursive DNS resolver.
This resolver is usually provided by your ISP, but you can also use public resolvers such as Cloudflare's 1.1.1.1 or Google's 8.8.8.8.
The resolver's job is to find the answer on your behalf.
It also caches DNS responses, so if someone recently requested the same domain, the resolver may already know the answer without performing the entire lookup again.
3. The resolver asks a Root Nameserver
If the answer isn't already cached, the recursive resolver starts at the top of the DNS hierarchy.
The Root Nameservers don't usually know the IP address of example.com.
Instead, they know where to find the nameservers responsible for different Top-Level Domains.
For example:
.com
.org
.net
The root server essentially tells the resolver:
"I don't know where
example.comis, but I know who is responsible for.com."
4. The resolver asks the TLD Nameserver
The resolver then contacts the TLD (Top-Level Domain) Nameserver responsible for .com.
The TLD server also doesn't normally contain the final IP address.
Instead, it tells the resolver which authoritative nameserver is responsible for example.com.
5. The resolver asks the Authoritative Nameserver
Now the resolver contacts the authoritative nameserver for example.com.
This server is responsible for the actual DNS records for the domain.
It might respond with something like:
example.com → 93.184.216.34
The resolver now knows the IP address.
6. The IP address is returned
The recursive resolver sends the answer back to your computer.
Your browser now knows where the website is located.
7. Your browser connects to the server
Finally, your browser can establish the actual connection to the web server using the IP address.
DNS is now finished.
The browser can proceed with the HTTP or HTTPS request and retrieve the website.
So the entire process can be simplified to:
example.com
     ↓
DNS Resolver
     ↓
Find authoritative DNS information
     ↓
93.184.216.34
     ↓
Web Server
     ↓
Website
One important detail is that DNS responses are often cached.
If the resolver already knows the answer, it doesn't need to contact the root, TLD, and authoritative nameservers every time. This makes subsequent lookups significantly faster.
Structure of DNS
DNS is hierarchical.
This hierarchy allows the system to scale across billions of devices and domains without relying on one giant database.
1. Root
The root is the top of the DNS hierarchy.
It is represented by:
.
You normally don't see this dot because it is implied.
For example:
example.com.
The root sits above .com.
2. Top-Level Domains
The level directly below the root contains Top-Level Domains (TLDs).
Some examples are:
.com
.org
.net
.edu
.in
.dev
For:
example.com
.com is the TLD.
3. Second-Level Domain
The part directly before the TLD is the domain registered by an organization or individual.
For:
example.com
example is the second-level domain.
Together:
example + .com

example.com
forms the domain name.
4. Subdomains
A domain can contain additional levels called subdomains.
For example:
blog.example.com
api.example.com
mail.example.com
Here:
blog
api
mail
are subdomains of example.com.
Subdomains are commonly used to separate different services or parts of an application.
For example:
example.com       → Main website
blog.example.com  → Blog
api.example.com   → API
5. Hostnames
A hostname identifies a particular host or service within a domain.
For example:
api.example.com
can be a hostname used by an API server.
DNS records are ultimately used to associate these names with addresses or other DNS information.
Common DNS Records
DNS records contain information about how a domain should be resolved.
There are many different record types, but these are some of the most commonly encountered ones.
A Record
An A record maps a hostname to an IPv4 address.
For example:
example.com → 93.184.216.34
You can think of it as:
Domain name → IPv4 address
A records are commonly used when you have an IPv4 address for the server hosting your website.
CNAME Record
A CNAME, or Canonical Name, maps one hostname to another hostname.
For example:
www.example.com → my-project.vercel.app
Instead of directly providing an IP address, the CNAME tells the resolver to follow another hostname.
Conceptually:
www.example.com
       ↓
my-project.vercel.app
       ↓
IP address
This is useful for services such as Vercel because the underlying infrastructure can change without you having to manually update an IP address.
MX Record
An MX (Mail Exchange) record specifies which mail servers are responsible for receiving email for a domain.
For example:
example.com → mail.example.com
This is what allows services such as Gmail or other mail servers to determine where an email for:
hello@example.com
should be delivered.
TXT Record
A TXT record stores text associated with a domain.
TXT records are commonly used for things such as:
- Domain ownership verification
- Email authentication
- SPF
- DKIM
- DMARC
- Service configuration
For example, a service may ask you to add a TXT record to prove that you control a particular domain.
NS Record
An NS (Name Server) record specifies which nameservers are authoritative for a domain.
For example:
example.com → ns1.cloudflare.com
When you move your DNS management to Cloudflare, you change the nameservers at your domain registrar to the nameservers Cloudflare provides.
This tells the internet:
"Cloudflare is now responsible for answering DNS queries for this domain."
Adding Custom Domains
Now that we understand the basics of DNS, let's actually connect a domain to a website.
For this example, we're going to use three services:
- Spaceship for purchasing the domain
- Cloudflare for DNS management
- Vercel for hosting the website
The exact UI of these services can change over time, but the underlying DNS concepts remain the same.
Step 1: Buy a Domain
First, you need a domain.
You can use any domain registrar you prefer. Personally, I use Spaceship.
After purchasing your domain:
- Open the Spaceship dashboard.
- Go to Domain Manager.
- Select the domain you purchased.
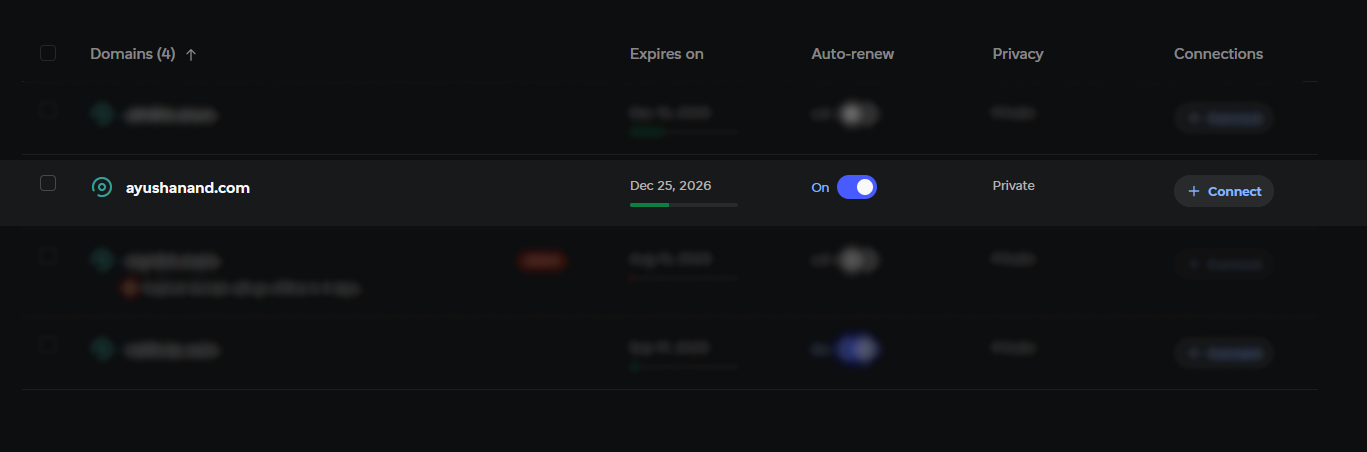
You should now have control over the domain and its DNS settings.
Step 2: Add the Domain to Cloudflare
Open the Cloudflare dashboard and add your domain.
Go to:
Cloudflare Dashboard -> Domains -> Add / Connect a domain
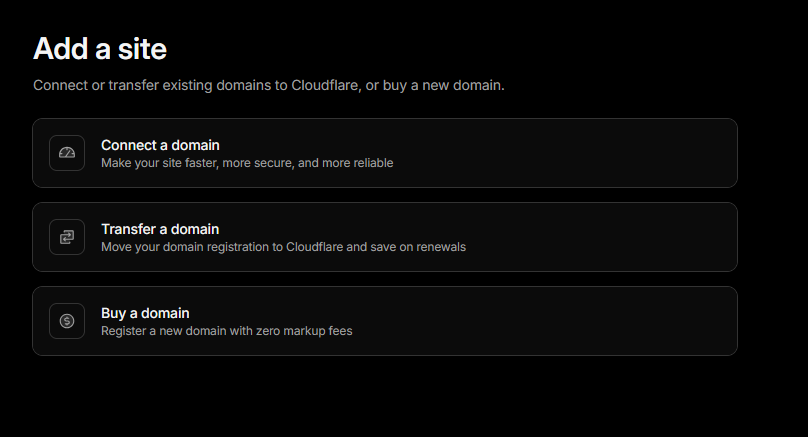
Enter the domain you purchased.
Cloudflare will then provide you with a pair of nameservers.
For example:
nameserver1.cloudflare.com
nameserver2.cloudflare.com
The actual nameservers will be different for your domain.
Step 3: Change Your Nameservers
Now we need to tell your domain registrar that Cloudflare should manage the DNS for your domain.
Go back to Spaceship and open:
Nameservers and DNS
Replace the existing nameservers with the nameservers provided by Cloudflare.
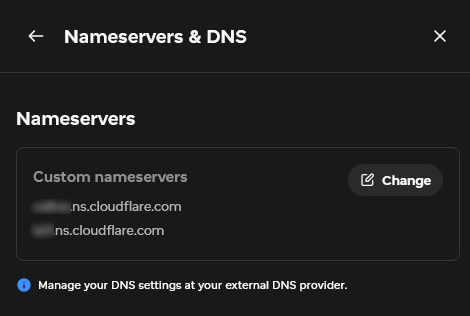
After this change, Cloudflare becomes the authoritative DNS provider for your domain.
In simple terms:
Before:
Spaceship -> DNS

After:
Spaceship -> Cloudflare -> DNS
The registrar still owns the registration of the domain, but Cloudflare is now responsible for answering DNS queries.
Step 4: Add the Domain to Vercel
Now let's connect the domain to your website.
Open the Vercel dashboard and select the project you want to connect.
Go to the project's Domains section and add your custom domain.
For example:
example.com
Vercel will show the DNS configuration required for the domain.
If the configuration is not correct yet, Vercel may display an Invalid Configuration message along with the required DNS records.

Don't worry about the warning yet.
We haven't configured the DNS records.
Step 5: Configure the DNS Records
Now go back to:
Cloudflare -> Your domain -> DNS -> Records
Vercel will tell you which records your domain needs.
For the root domain, Vercel provides an A record value.
For example:
Type: A
Name: @
Content: <Vercel IP>
The exact IP address should always be taken from your Vercel dashboard rather than copied from a random tutorial.
Add the A record to Cloudflare.
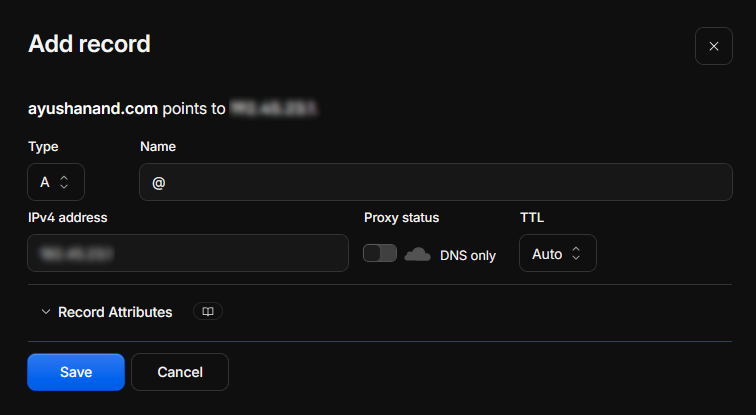
For this setup, keep the record DNS only while verifying the domain. In Cloudflare, this is represented by the grey cloud.
This allows DNS queries to resolve directly to the Vercel target instead of putting Cloudflare's reverse proxy in front of the Vercel deployment. Vercel currently recommends against using Cloudflare as a reverse proxy in front of Vercel deployments.
You will also usually want to configure the www version of your domain.
For example:
www.example.com
This is where a CNAME record comes in.
Your Vercel dashboard will provide the exact CNAME target.
It may look similar to:
Type: CNAME
Name: www
Target: <Vercel-provided hostname>
Again, use the value Vercel gives you.
The final setup will look roughly like:
Do not create additional conflicting A, AAAA, or CNAME records for the same hostname. Conflicting records are a common reason for a domain to remain in an invalid configuration state.
Step 6: Verify the Domain
Once the DNS records are configured, return to Vercel.
Vercel will check whether the DNS records match the configuration required for your project.
If everything is correct, the domain should move from:
Invalid Configuration
to a valid configuration.
Vercel will also provision the SSL/TLS certificate required to serve your website over HTTPS.
Eventually, you should be able to visit:
https://example.com
and see your Vercel deployment.
Understanding What We Just Configured
Let's step back and look at what actually happened.
We started with a domain purchased from a registrar:
Spaceship
Then we changed the nameservers to Cloudflare:
Spaceship -> Cloudflare
This made Cloudflare responsible for the DNS records of our domain.
Then we added DNS records telling the internet where our website lives:
example.com -> A Record -> Vercel
and:
www.example.com -> CNAME -> Vercel
So when someone types:
example.com
into their browser, the DNS system can eventually resolve that domain to the infrastructure serving our website.
The important part is that DNS does not host your website.
DNS simply helps clients find where the website is.
The actual website is still running on Vercel.
Common DNS Problems
DNS is relatively simple once you understand the hierarchy, but a few problems appear frequently.
1. DNS Propagation
After changing nameservers or DNS records, the changes may not appear everywhere immediately.
DNS resolvers cache responses according to their TTL, so different networks can temporarily have different answers.
This is why you might be able to access your website from one network while another still shows the old configuration.
If you have just changed a record, give it some time before assuming the configuration is broken.
2. Incorrect Nameservers
If you purchased the domain from Spaceship but forgot to change its nameservers to the ones provided by Cloudflare, Cloudflare won't be authoritative for the domain.
You can have the correct DNS records inside Cloudflare and still have the website fail because the internet is asking a different DNS provider for the answer.
Always check the nameservers at your registrar.
3. Incorrect A or CNAME Records
Make sure the values in Cloudflare exactly match the values shown by Vercel.
For example:
A
@
<Vercel IP>
and:
CNAME
www
<Vercel CNAME target>
Do not blindly copy values from another tutorial because hosting providers can change their infrastructure and DNS requirements.
4. Conflicting DNS Records
Having multiple records for the same hostname can cause unexpected results.
For example, if you have:
www → old-server.example.com
and:
www → Vercel
at the same time, DNS may not behave the way you expect.
Remove old or conflicting records that are no longer required.
5. Cloudflare Proxy Issues
Cloudflare's orange cloud means that traffic is being proxied through Cloudflare.
The grey cloud means DNS only.
For a simple Cloudflare DNS + Vercel setup, DNS-only is the safer starting point because Vercel does not recommend putting an external reverse proxy in front of its deployments.
If you later decide to proxy traffic through Cloudflare, make sure you understand the additional SSL, caching, routing, and Vercel compatibility considerations.
6. SSL Certificate Issues
DNS and HTTPS are two different things.
DNS answers:
"Where should this domain resolve?"
SSL/TLS answers:
"Can I establish a secure HTTPS connection to this website?"
Vercel automatically handles SSL certificates for custom domains, but certificate issuance can fail if the DNS configuration is incorrect or Vercel cannot verify the domain.
If Vercel is unable to issue the certificate, check your DNS records first.
7. www vs Root Domain
These two are different hostnames:
example.com
www.example.com
The first is the apex/root domain, while the second is a subdomain.
They can therefore have different DNS records.
If you want both versions to work, make sure both are configured in Vercel and have the appropriate DNS records.
Final Thoughts
DNS looks complicated at first because there are a lot of unfamiliar terms:
Resolvers
Nameservers
Root Servers
TLDs
A Records
CNAMEs
MX Records
TXT Records
But the core idea is surprisingly simple.
You have a human-readable name:
example.com
DNS helps turn that name into information that computers can use to locate the appropriate service.
When you connect a custom domain to Vercel using Cloudflare, you're essentially building this chain:
Domain -> Nameservers -> Cloudflare DNS -> DNS Records -> Vercel -> Your Website
Once you understand that chain, adding a custom domain stops feeling like a bunch of random settings and starts making sense.
And that's really all DNS is doing.
Bonus
If you have made this far, I have an interesting thing that you could do in your terminal.
Just type ping website.com and run it. The DNS shows the actual IP it is pointing to.
You could even copy the IP and open it in your browser to take you to that page.
~ Thanks for reading the blog.